


This is the story of the birth of our nation and the most famous document in our history, the Declaration of Independence. American exceptionalism starts with the ideas enshrined in this document: “all men are created equal,” “they are endowed by their Creator with certain unalienable rights,” “Life, Liberty, and the Pursuit of Happiness,” “to secure these rights, governments are instituted among men,” and that governments derive “their just Powers from the consent of the governed.” Or, as Alice Dalgliesh calls it, “The Story of Freedom.”
Dalgliesh also touches on other important themes. The Liberty Bell is prominently placed in her story and she calls out the Biblical scripture inscribed on it: “Proclaim liberty throughout all the land, Unto all the inhabitants thereof.” Her final chapter, “To Carry the News” opens with this line and she repeats it as her final words. She also highlights the theme of religious freedom and immigration in that last chapter: “The farmer wasn’t British like many of the people in the colonies. He spoke German. His people had come to America to be free to worship God in their own way.”
The text is a bit long for younger readers. The Liberty Bell, one of the most famous icons of America, features prominently in the story. Try giving your kids a bell and asking them to ring it every time the word “liberty” or “bell” is mentioned. This helped keep our younger kids engaged in the story, though we did make them take turns as the “Liberty Bell Ringer.” Other activities can also be done during the reading such as Counting (animals, etc.), coloring sheets, Geography, and Vocabulary (all described below).
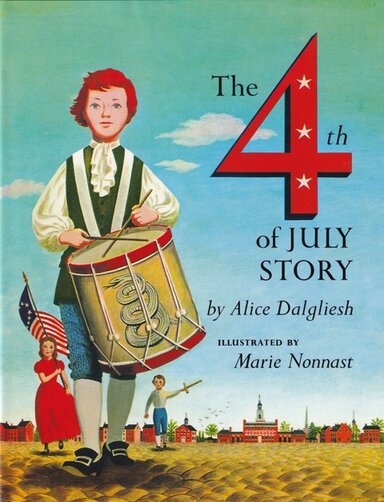
Title: The 4th of July Story
Author: Alice Dalgliesh
Illustrator: Marie Nonast
Year Published: 1956
Length: 32 pages
Below is one suggestion for your week with the book The 4th of July Story. Please experiment with what works for your family! (Note: not all activities are included in the suggested sample week below).
toc: "Songbook: _America the Beautiful_"
time: 5 minutes
freq: daily
Katherine Lee Bates wrote the words to America the Beautiful after traveling across the United States to the top of Pike’s Peak in Colorado: “our sojourn on the peak remains in memory hardly more than one ecstatic gaze. It was then and there, as I was looking out over the sea-like expanse of fertile country spreading away so far under those ample skies, that the opening lines of the hymn floated into my mind.”
O beautiful for spacious skies, For amber waves of grain, For purple mountain majesties, Above the fruited plain!
America! America! God shed his grace on thee And crown thy good with brotherhood From sea to shining sea!
Originally published as a poem on the Fourth of July, 1895, it wasn’t until 1910 that her words were married with the melody we know today. While many tunes were attached to it (e.g., Auld Lang Syne), the one that stuck was a hymn written in 1882 by Samuel A. Ward, the organist and choir director of Grace Church in Newark. All four stanzas of Bates’ poem call out to God, making Ward’s hymn a fitting accompaniment.
Many people have argued that America the Beautiful should be our national anthem instead of The Star-Spangled Banner. While it’s first verse captures the grandeur of America’s natural beauty, the second verse pays tribute to our love of freedom and liberty. The third verse honors those who fought and died for us.
Rarely do you hear all four verses sung together. This version (with lyrics) includes the first, third, and fourth, as does this modern version by Lee Greenwood. The Cedarmont Kids cover all four verses as does this version with lyrics.
To keep it fresh for your child(ren), try playing a different version each day before (or after) the reading. They should be singing along with you when you get to the Supplemental Reading below, with its stunning illustrations of the words to America the Beautiful.
toc: "Arts & Crafts: Liberty Bell"
time: 30-40 minutes
prep: 20-30 minutes
supplies: plastic cup, foil, pipe cleaners, small bells, toilet paper roll, construction paper, glue, markers, scissors
The Liberty Bell rang out, and all the bells in the city were set to ringing. They rang all day and kept on ringing as the stars came out in the night sky.
To make your own Liberty Bells, try following the instructions below (adapted from a couple of online sources).
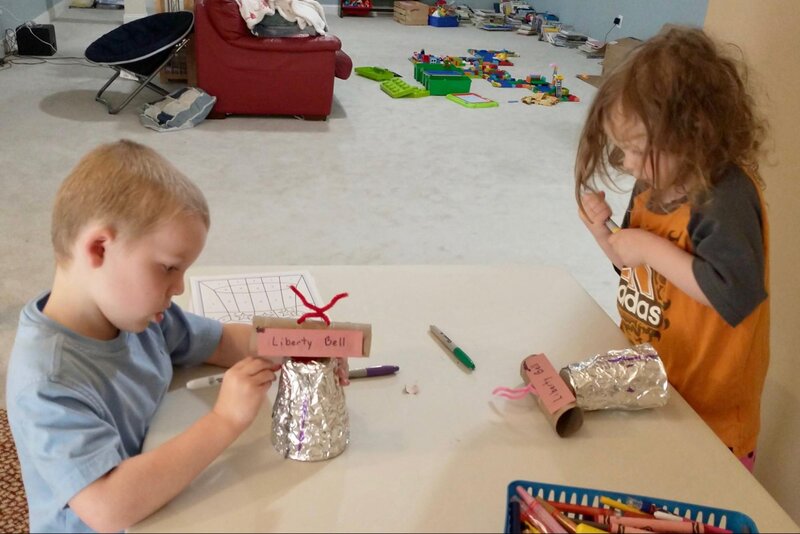
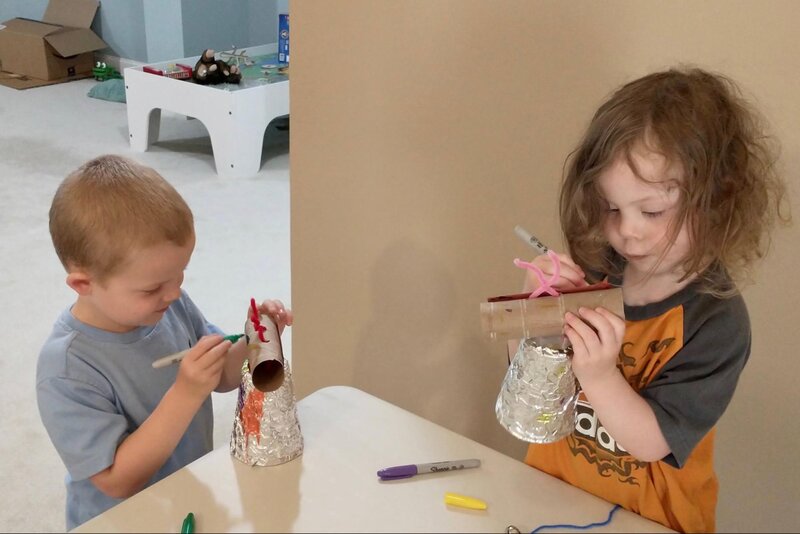
My kids liked the bells and loved decorating the Liberty Bell at the end. Threading the pipe cleaner through was a bit challenging and so adult assistance was critical. At the end, they rang the bells and said “Liberty for all people; liberty to all inhabitants,” just like the story.
For younger kids (and older kids who like coloring), there are multiple Liberty Bell coloring sheets online.
time: 15 minutes
supplies: U.S. puzzle
On the east coast there were thirteen colonies that belonged to Britain. Each one was like a little separate country.
This activity illustrates how small the United States was when we started out. It can be done multiple ways; here are some suggestions:
Next, have your student(s) locate Philadelphia on the map. Then, locate New York City. Remind them that one messenger had to carry the Declaration of Independence from Philadelphia to New York so that George Washington could read it to his soldiers as they awaited British troops to attack them.
Then, ask your student(s) to note which state is farthest away from Philadelphia. Read the part of the story that discusses how long it took to reach the southern states (two months!). Remind them that there were no phones, cars, trains, or planes back in those days and the fastest way to travel over land to spread the news was by horseback. Finally, locate the boundary between North and South Carolina where young Andrew Jackson read the Declaration of Independence to his neighbors.
toc: "Famous Texts: _Declaration of Independence_"
time: 5-10 minutes
freq: daily
Thomas Jefferson wrote perhaps the most inspiring and revolutionary sentence of America’s founding in the Declaration of Independence:
We hold these truths to be self-evident, that all men are created equal, that they are endowed by their Creator with certain unalienable rights, that among these are Life, Liberty, and the Pursuit of Happiness.
The phrase “all men are created equal” would inspire generations of Americans. Abolitionists, suffragettes, and civil rights leaders would return to them again and again as they fought for recognition of their own rights to “Life, Liberty, and the Pursuit of Happiness.”
Ask your child(ren) to memorize this sentence or, for younger children, just the phrase. Have them recite before or after each reading.
time: 45-60 minutes
prep: 20-30 minutes (shopping)
One day a young French general named Lafayette landed in America. He brought the news that ships and soldiers were coming from France to join the Americans in their fight for liberty.
Lafayette visited George and Martha Washington in April, 1781. They served him gingerbread and the recipe was then referred to as Lafayette Gingerbread. You can read the recipe online or just follow the directions below.
Confession: we ate ours while it was still warm. It was delicious!
time: 20-30 minutes
prep: 10 minutes
supplies: "[feather](https://www.etsy.com/listing/792455469/quill-pen-feathers), X-acto or sharp knife, [ink](https://www.dickblick.com/categories/drawing/calligraphy/inks/)"
All day, and part of each night, Thomas Jefferson sat in his rooms in a three-story brick house, writing.
Quill pens were the favorite writing instrument at the time of America’s founding and were used in writing the Declaration of Independence. They operate on the principle of capillary action (liquid flows in narrow spaces without the assistance, or even in opposition to, gravity). To make your own quill pen you only need two items: a feather and an x-acto knife (or other sharp knife to shape the feather). Making your own quill pen should be done by an adult with the kids watching. You can read about making a quill pen here or here and/or you can watch a Youtube video on the process here. The basic instructions are:
Once you have your quill pen you will need ink which you can obtain from an art supply store or online. Quill pens are more challenging to operate but they can also be more artistic (and fun!) than the pens we use for day-to-day writing. Warning: they can also be messy!
toc: "Re-enactment: Signing the Declaration"
time: 20 minutes
prep: 10 minutes
supplies: printed Declaration of Independence, quill (or regular) pen
When the men from all the states had agreed, they signed their names.
This is a great activity to do with other homeschooling families, family friends, and extended family. Getting more people to participate in the signing enhances the fun and the memories. But you can also involve extended family when it comes time to “proclaim liberty throughout the land, unto all the inhabitants thereof.”
Our historical re-enactment of the Signing of the Declaration of Independence required three items:
Download a copy of the Declaration of Independence (for the wikipedia version click the download button on the lower right). If you print it on a standard 8.5x11 paper there will only be a little room for you and your child(ren) to sign, so consider printing either US Legal size (8.5x14) or larger (11x17).
Read the first two sentences aloud to your child(ren). Then place your copy on the table and have every member of the family sign it with the quill pen or the fanciest pen you have available (very young children can just make their “mark”).
For the finale, Daddy galloped the kids to Grandma and Grandpa’s house so they could “spread the news throughout the land” and mount the signed Declaration on their refrigerator. (Don’t forget the galloping sounds!). An alternative finale is to designate a starting point as Philadelphia and an ending point as New York. Ask your kids to mount their “horses” (bikes, trikes, scooters) and “gallop” to New York to deliver the message to General Washington. This works great for multiple children who can form a relay between “Philadelphia” and “New York.” (Again, don’t forget the galloping sounds!).
time: 10 minutes
O beautiful for heroes proved In liberating strife, Who more than self their country loved And mercy more than life!
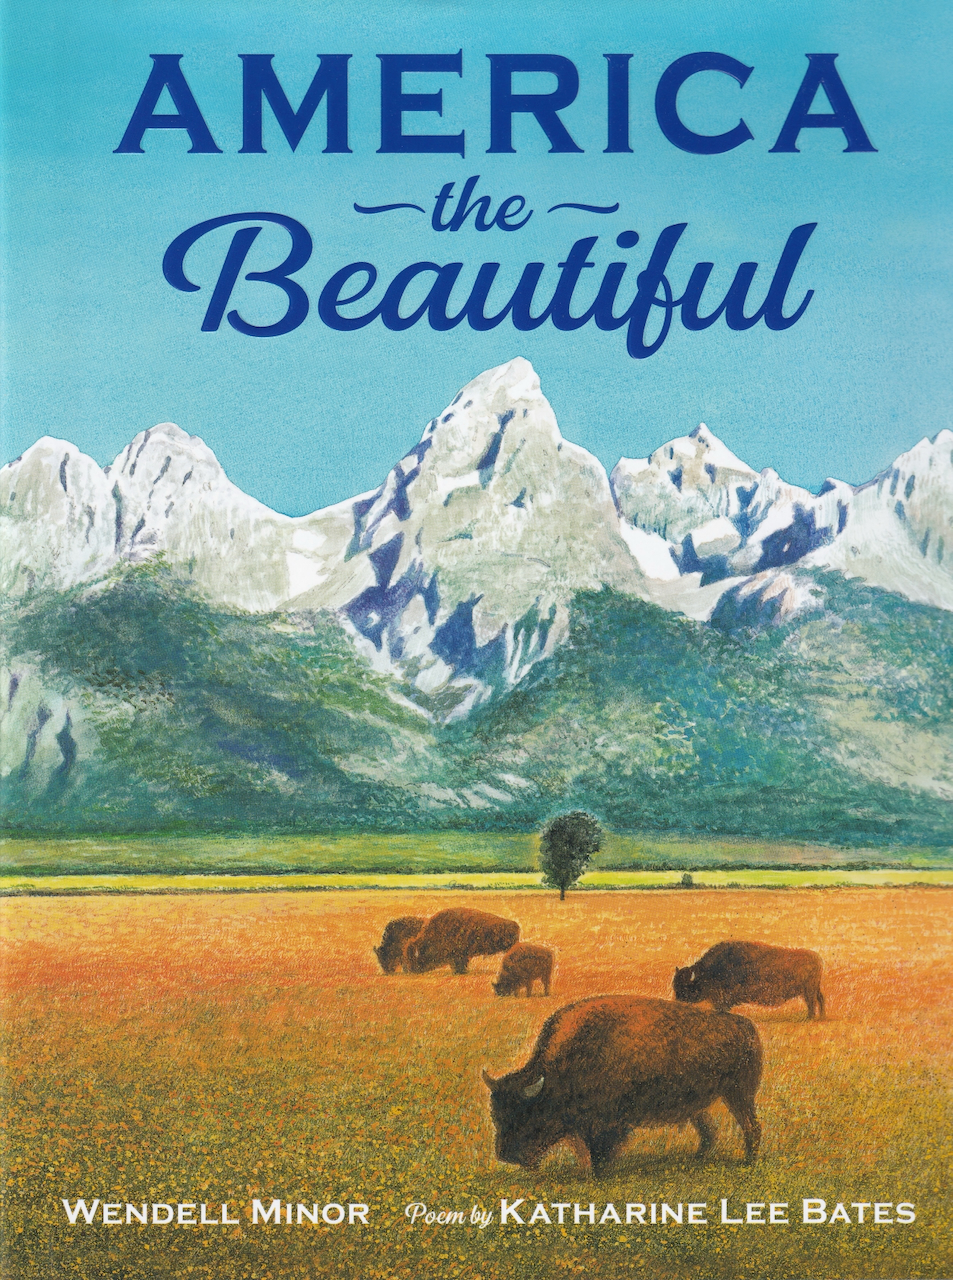
Title: America the Beautiful
Author: Katherine Lee Bates
Illustrator: Wendell Minor
Year Published: 2020
Length: 48 pages
This is a simple book. Each double-page spread is gloriously illustrated by Wendell Minor accompanied by a snippet of the song, America the Beautiful. All four verses are spread out over the 48 pages of famous locations across the United States. There is a map in the back identifying each location.
time: 10 minutes
Perhaps the minister read the words on the Liberty Bell just as they were engraved on the bell – for they come from the Bible and sound like the deep tones of the bell itself: “Proclaim liberty throughout all the land, Unto all the inhabitants thereof”
There are two strong religious connections worth noting in this module. The first is in the text of the Declaration itself, where Jefferson notes that everyone is “endowed by their Creator with certain unalienable rights.” These “unalienable rights” are bestowed upon everyone by God and cannot be taken away by governments. In fact, as the Declaration notes, it is the primary function of government to protect these natural rights.
Alice Dalgliesh has the Liberty Bell ring throughout her story. Inscribed on it is the Bible verse, “Proclaim LIBERTY throughout all the Land unto all the Inhabitants thereof” (Leviticus 25:10). This scripture refers to the Jubilee, when Israelites were instructed to free their slaves. Consider this scripture as an alternate (or additional) memory exercise for your child(ren).
time: 10 minutes
They chose a committee of five men to write down the things they believed in, and all the reasons why they wanted to be free. It would be a DECLARATION of INDEPENDENCE.
This module’s vocabulary words are taken directly from key passages of the Declaration of Independence.
time: 10 minutes
Often he crossed out one word and put in another… It was not easy for him to sit there as the Congress made changes in the Declaration.
Editing writing is an important skill (both editing one’s own writing, editing others’ writing, and accepting editing of one’s own writing from others) and will be used throughout one’s lifetime. There are two types of editing: proofreading and copy editing. Proofreading focuses on grammar, spelling, punctuation, capitalization and formatting. When writers say “the essence of writing is rewriting” they are referring to copy editing, which focuses on clarity, tone, wordiness, transitions and misused words.
In this activity, we practice proofreading. Write a short note (with errors) and then present it to your child(ren) for editing. Emphasize that everyone (even the most experienced writer) needs to do editing to correct and improve his or her work.
For young children, the editing can be as simple as looking for capitalization at the beginning of a sentence. Point out the periods indicating the end of a sentence and have them check to make sure that all of the next words are capitalized. For example: “Thomas Jefferson wrote the Declaration of Independence. he worked hard on it. After he wrote it, many others edited it until everyone was satisfied with it. many parts of the document became famous phrases.”
For older children, they can check for spelling, spacing, capitalization, and punctuation errors. For example: “Thomas Jefferson wrote the declaration of Independence. he was from Virginia and had red HAIR.he worked hard on it. After he wrote it many others edited it until everyone was satisfied with it. many parts of the document became fmous phrases. My favorite line is "all men are created equal. What is your favorite part The Declaration of Independence is now in the National Archives inWashington, D.C.”
If they are really excited about editing, you can share with them the secret code (special symbols/marks) used by proofreaders to edit.
time: 5 minutes
All through the country the riders went, taking the news that the Liberty Bell had told – Liberty throughout the land, Liberty to all the people.
The Liberty Bell plays a prominent role in Alice Dalgliesh’s story. But did you know that it wasn’t called the Liberty Bell at the time of her story? It wasn’t until the 1830s, almost fifty years after the Declaration of Independence was signed, that abolitionists starting referring to it as the Liberty Bell as they waged their campaign to abolish slavery in the United States. The National Park Service has a short history of the Liberty Bell, including this section on how it became known as the Liberty Bell:
The State House bell became a herald of liberty in the 19th century. “Proclaim Liberty Throughout All the Land Unto All the Inhabitants thereof,” the bell’s inscription, provided a rallying cry for abolitionists wishing to end slavery. The Anti-Slavery Record, an abolitionist publication, first referred to the bell as the Liberty Bell in 1835, but that name was not widely adopted until years later.
Millions of Americans became familiar with the bell in popular culture through George Lippard’s 1847 fictional story “Ring, Grandfather, Ring”, when the bell came to symbolize pride in a new nation. Beginning in the late 1800s, the Liberty Bell traveled across the country for display at expositions and fairs, stopping in towns small and large along the way. For a nation recovering from wounds of the Civil War, the bell served to remind Americans of a time when they fought together for independence. Movements from Women’s Suffrage to Civil Rights embraced the Liberty Bell for both protest and celebration.
Now a worldwide symbol, the bell’s message of liberty remains just as relevant and powerful today: “Proclaim Liberty Throughout All the Land Unto All the Inhabitants thereof.”
time: 10 minutes
supplies: "$2 bill (optional)"
But when the Declaration of Independence was finished, most of the words were Thomas Jefferson’s.
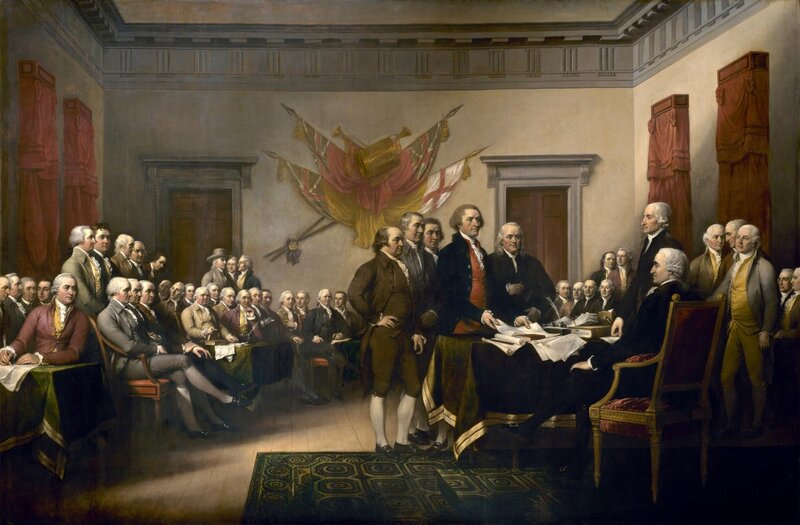
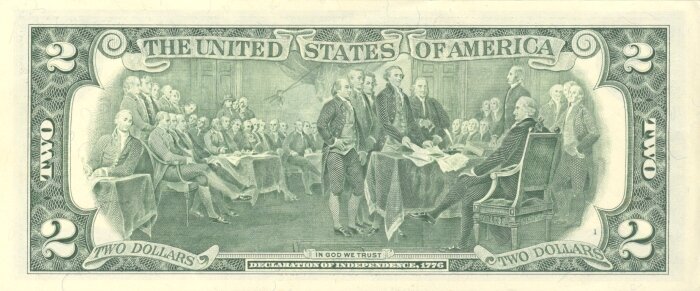
John Trumbull painted the most iconic painting of the Declaration of Independence in 1818 when most of the signers were still alive. The large (12’ by 18’) painting was hung in the rotunda of the United States Capitol in 1826. The scene is set in Independence Hall and depicts the five man committee (Thomas Jefferson, John Adams, Benjamin Franklin, Roger Sherman, Robert Livingston) tasked with drafting the Declaration as they present it to John Hancock, the president of the Second Continental Congress.
Ask your kids to examine the painting. Thomas Jefferson is the most important author of the Declaration of Independence. Without identifying him, can your child(ren) find him? What makes him stand out in the painting — what catches the eye? Trumbull uses a number of things to draw our attention to Jefferson: he is the only one wearing a bright color; he is the tallest of the committee of five; he is in the foreground; he is placed almost in the center of the painting; all the others are staring towards him; he is the one holding the Declaration.
Your child(ren) might also be interested in seeing Trumbull’s painting on the back of the $2 bill, if you can obtain one (there is an image below but an actual $2 will be more impressive). Jefferson does not stand out quite so dramatically when everyone is colored green.
time: 10 minutes
Our country was not always the big nation it is now.
For the younger crowd, you can look at Marie Nonast’s illustrations and discuss elements of the time period as well as practice counting. We enjoyed pointing out/counting how many dogs, horses, children, women, boats, drums, etc. were on different pages. I pointed out that the women and girls all wore dresses (which made them easy to pick out). We also pointed out other indications of the times (in addition to attire) such as the use of quill pens.
You can also gather some toy horses, cars and planes and ask your children what kind of transportation early Americans had to rely on. Then compare yesteryear with today’s transportation. (This may be another opportunity to take a gallop on the Daddy horse :-).